
GABC Tutorial
The purpose of this tutorial is to demonstrate how to represent a Gregorian chant score in gabc. However, we are not going to assume a familiarity with the terminology used to describe such a score in order to make this introduction easier to follow for those who are relatively new to chant more generally (and not just typesetting it).
Documentation for the gabc notation which we use in this tutorial can be found here. We will also link to the various parts of the documentation as it becomes relavent. A one-page summary is also on-line (PDF).
In this tutorial we’ll be using the Illuminare Score Editor and all the images will be derived from that tool because it has a built-in preview window that gives us nearly instantaneous feedback about what we’re doing. However, you could also use the Gregorio Chant Engraver if you prefer that. Obviously the images won’t match and some of the specific interface issues are different (including the lack of an instant preview), but the gabc itself is identical and we are specifically going to focus on that gabc notation. This makes for a much easier introduction for those not familiar with TeX. Once you’re comfortable with gabc notation, then you’ll find learning how to integrate it into larger projects using TeX much easier (as is done in our other tutorials).
Exaudivit
Here is a score from the Graduale Romanum:
It’s not the simplest score in the world, but it is not overly complicated either and it illustrates several of the most common features of Gregorian chant allowing us to call out how to represent these using gabc as we go.
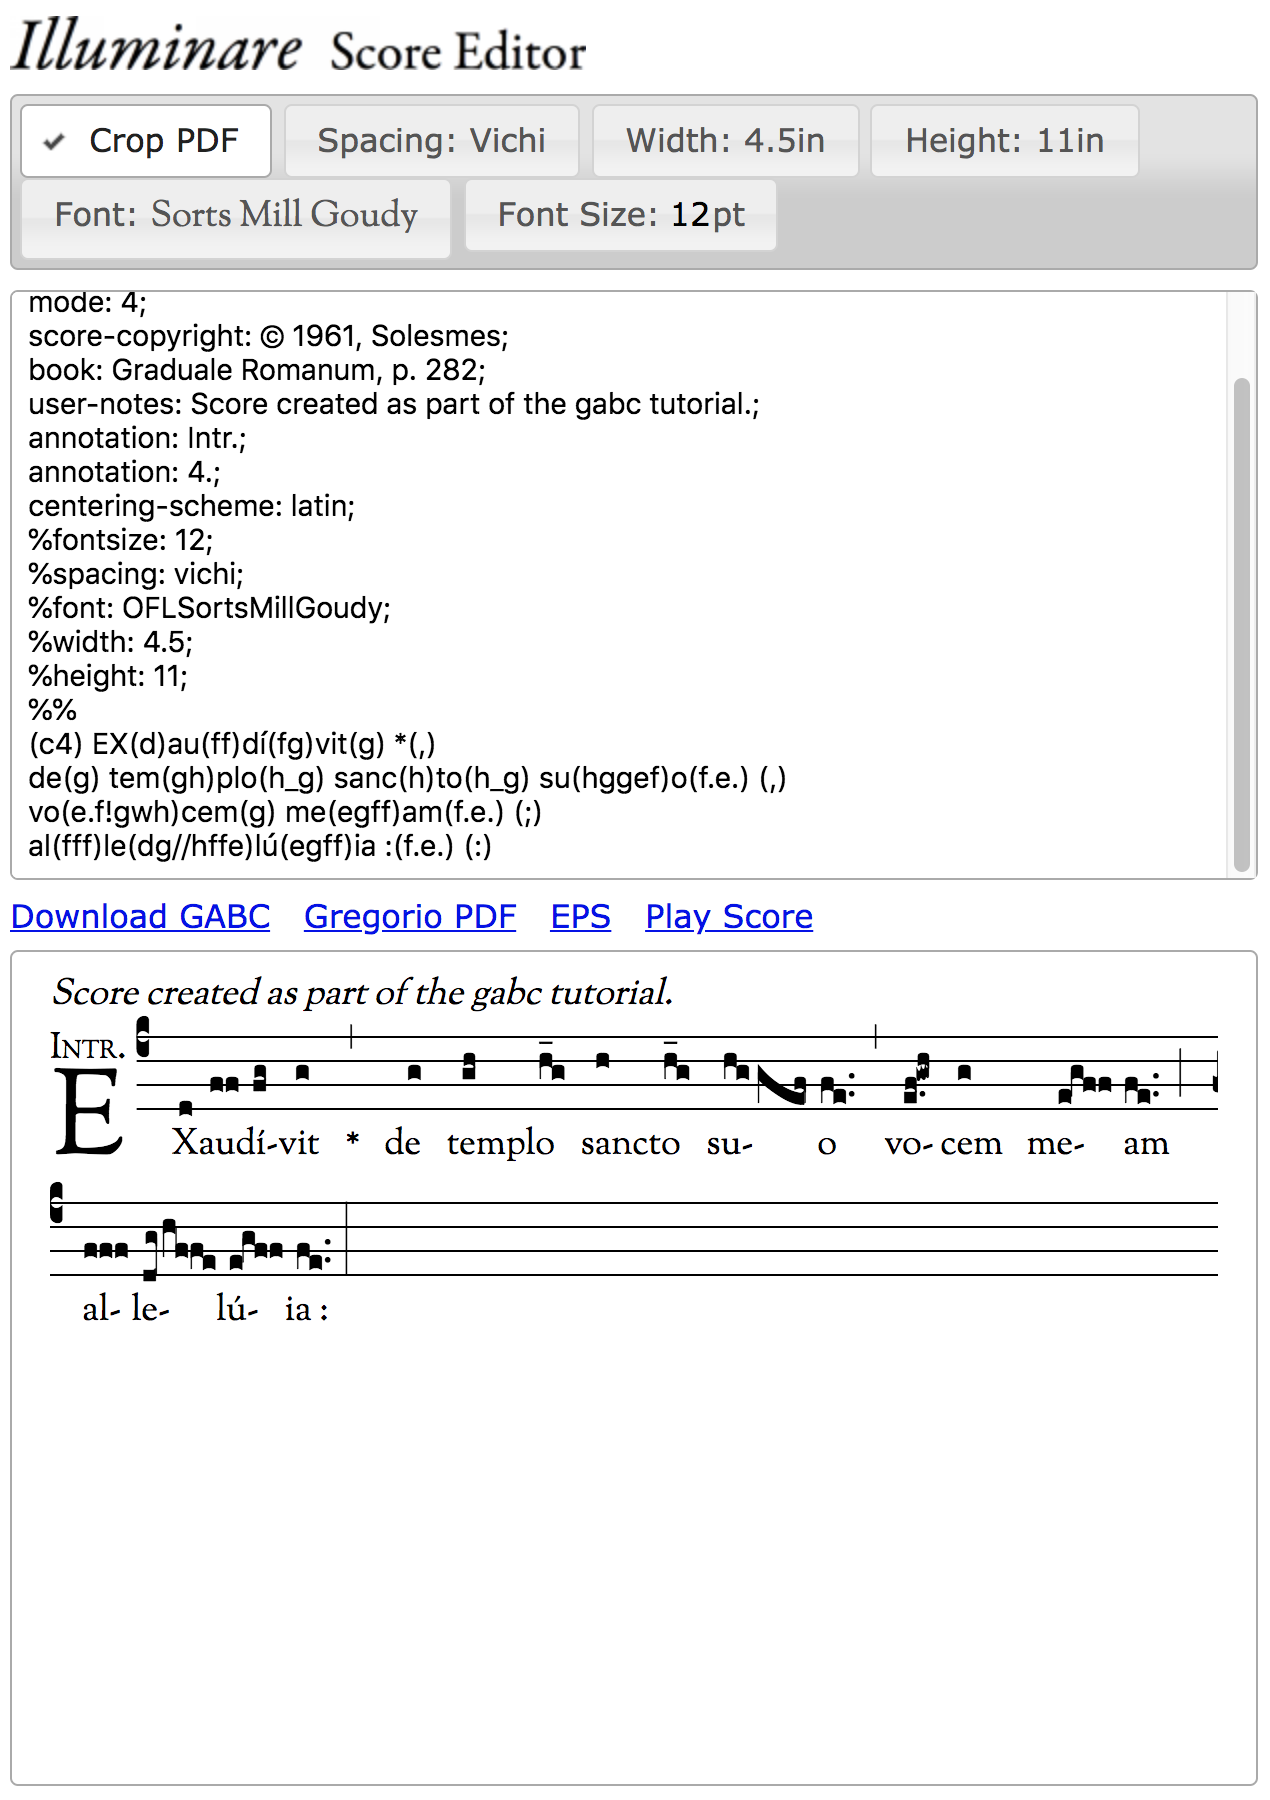
Obviously the first step is to fire up Illuminare Score Editor. When we do so we get a screen that looks like this:
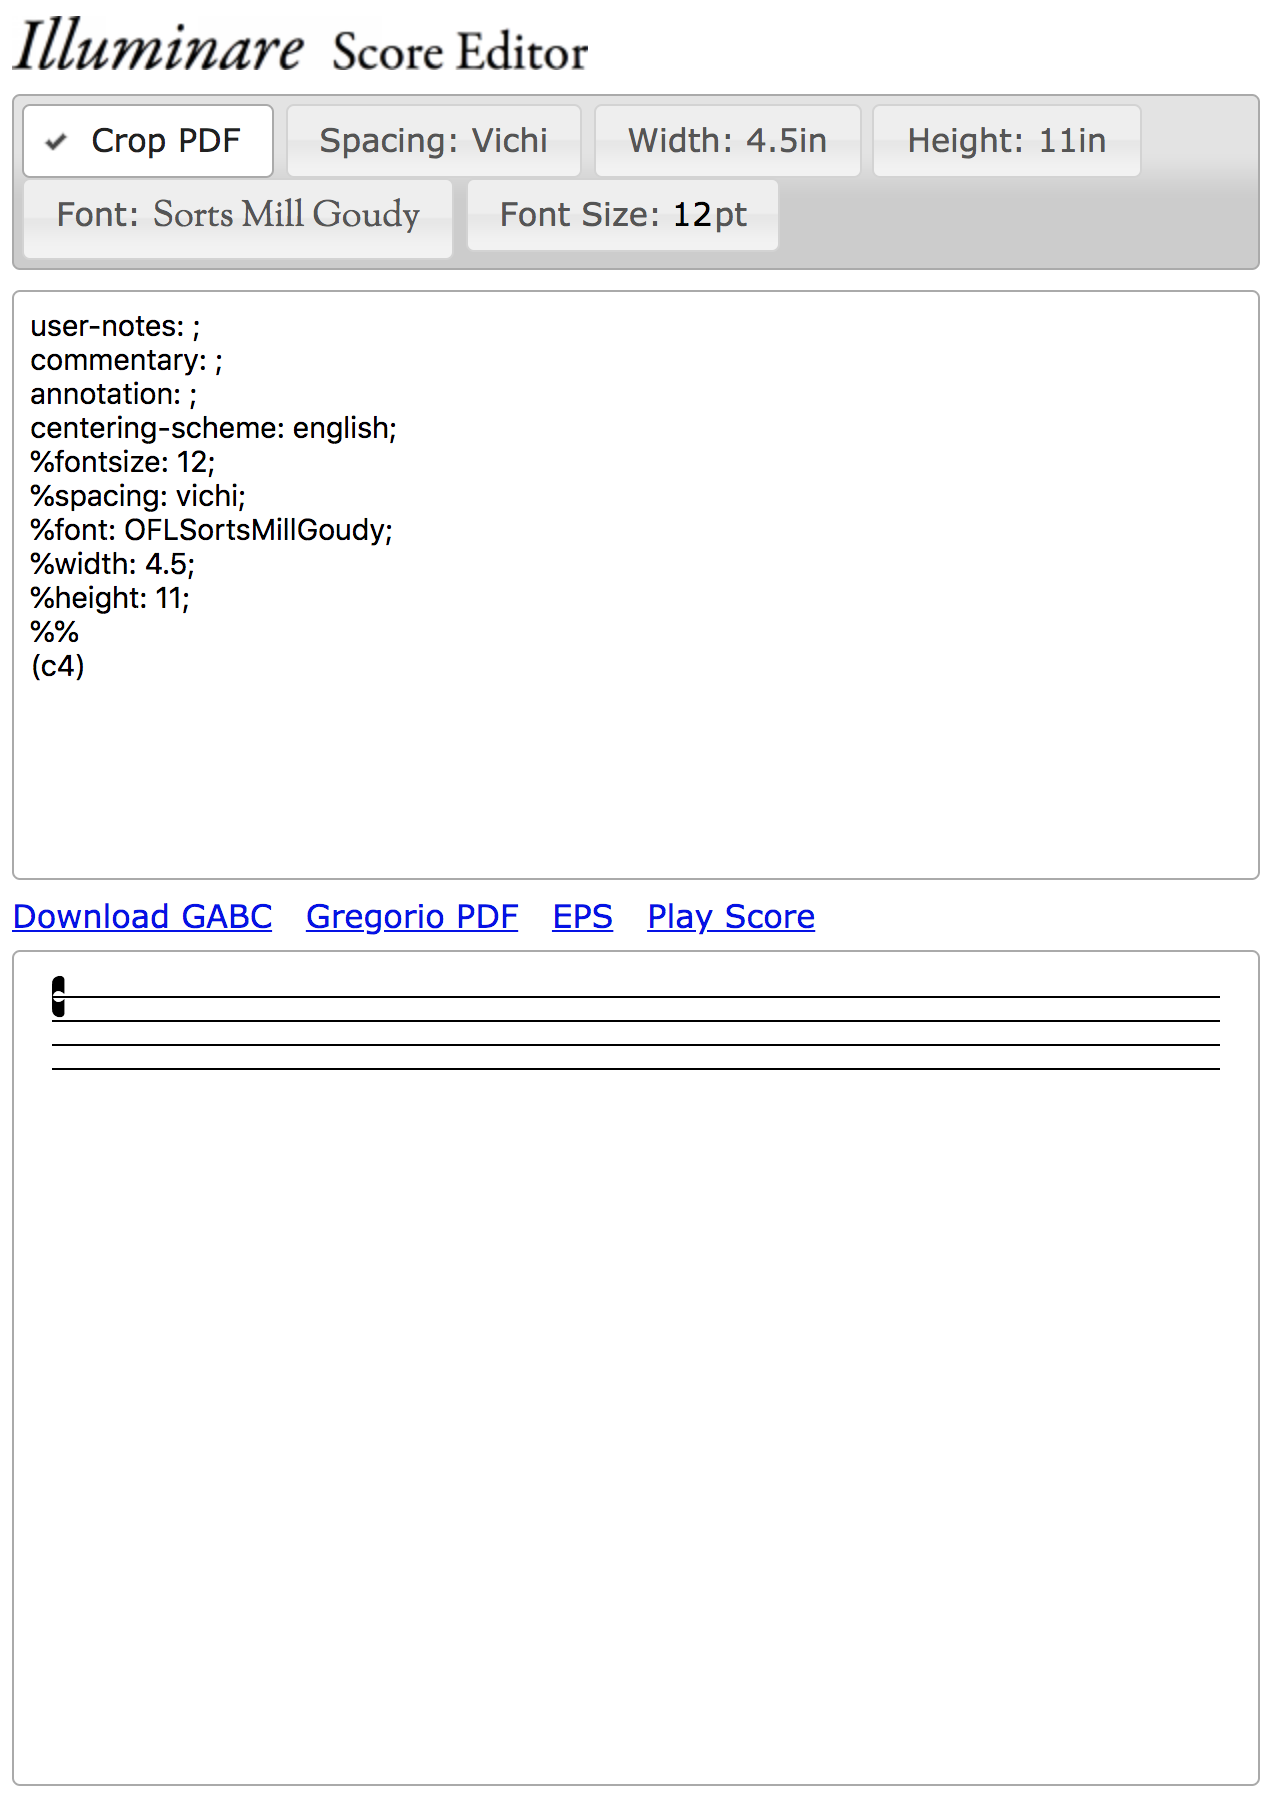
The top most pane allows us to control certain elements of how the score appears. We won’t be dealing with these in this tutorial.
The bottom most pane shows us a preview of our score. Illuminare will update this in real time as we work so you’ll be able to see exactly how the gabc you’re entering translates into a score.
The pane in the middle is where we’ll be entering our gabc code and as you can see, it’s already got some code in it by default. Let’s start by explaining what’s already there line by line:
user-notes: ;- This line is an empty header field. Headers are for describing you score so that when you come back to the file later you can figure out what it is, where it came from, and other things like that. This particular field is there for you to record any information that you want about the score. In this case I’m going to make a note that this is part of this tutorial. That note goes between the colon (
:) and the semi-colon (;). commentary: ;- This line is also an empty header field, but it’s for specific information about the score. In gabc parlance the commentary is the text that appears just above the top line of the staff and is flushed right. This is usually a scripture citation. Our piece, however, doesn’t have this line so we’re going to delete this line.
annotation: ;- Like commentary, annotations refer to a very specific part of the score in gabc parlance. In this case it’s the text which goes above the initial. Our score has two lines there, and fortunately gabc supports up to two annotation headers.
centering-scheme: english;- This header is actually a legacy header which is no longer supported in Gregorio. It formerly controlled how the text of the lyrics aligned with the notes above. This is now controlled in the TeX of a document, but because Illuminare doesn’t give you access to that, its continued use of an older version of Gregorio means that you still have access to it. In this case our text is in Latin and thus follows the Latin alignment conventions. In more recent versions of Gregorio we refer to this as
vowelcentering in order to be more descriptive. %fontsize: 12;%spacing: vichi;%font: OFLSortsMillGoudy;%width: 4.5;%height: 11;- These headers are not official headers, but rather ones which is specific to Illuminare. You’ll notice that the correspond to the features in the topmost panel and serve to record those settings so that you can duplicate them later should you need to (say for another score which will be part of the same document and thus should look similar to the first score). The
%at the beginning of each line indicates that the line is to be treated as a comment. That is, Gregorio is to ignore it when parsing the gabc. %%- Unlike the single
%on the previous lines, this double%%does not instruct Gregorio to ignore this line. Instead it indicates that we’re done with the headers and ready to begin the score itself. (c4)- This is the first part of the score and indicates the starting clef. There are two clefs in gabc: do (
c) and fa (f) and each can be on any of the 4 lines (1 on the bottom, 4 on the top). This here is a do clef on the 4th line, which is actually what we have in our score, so we’ll leave it alone.
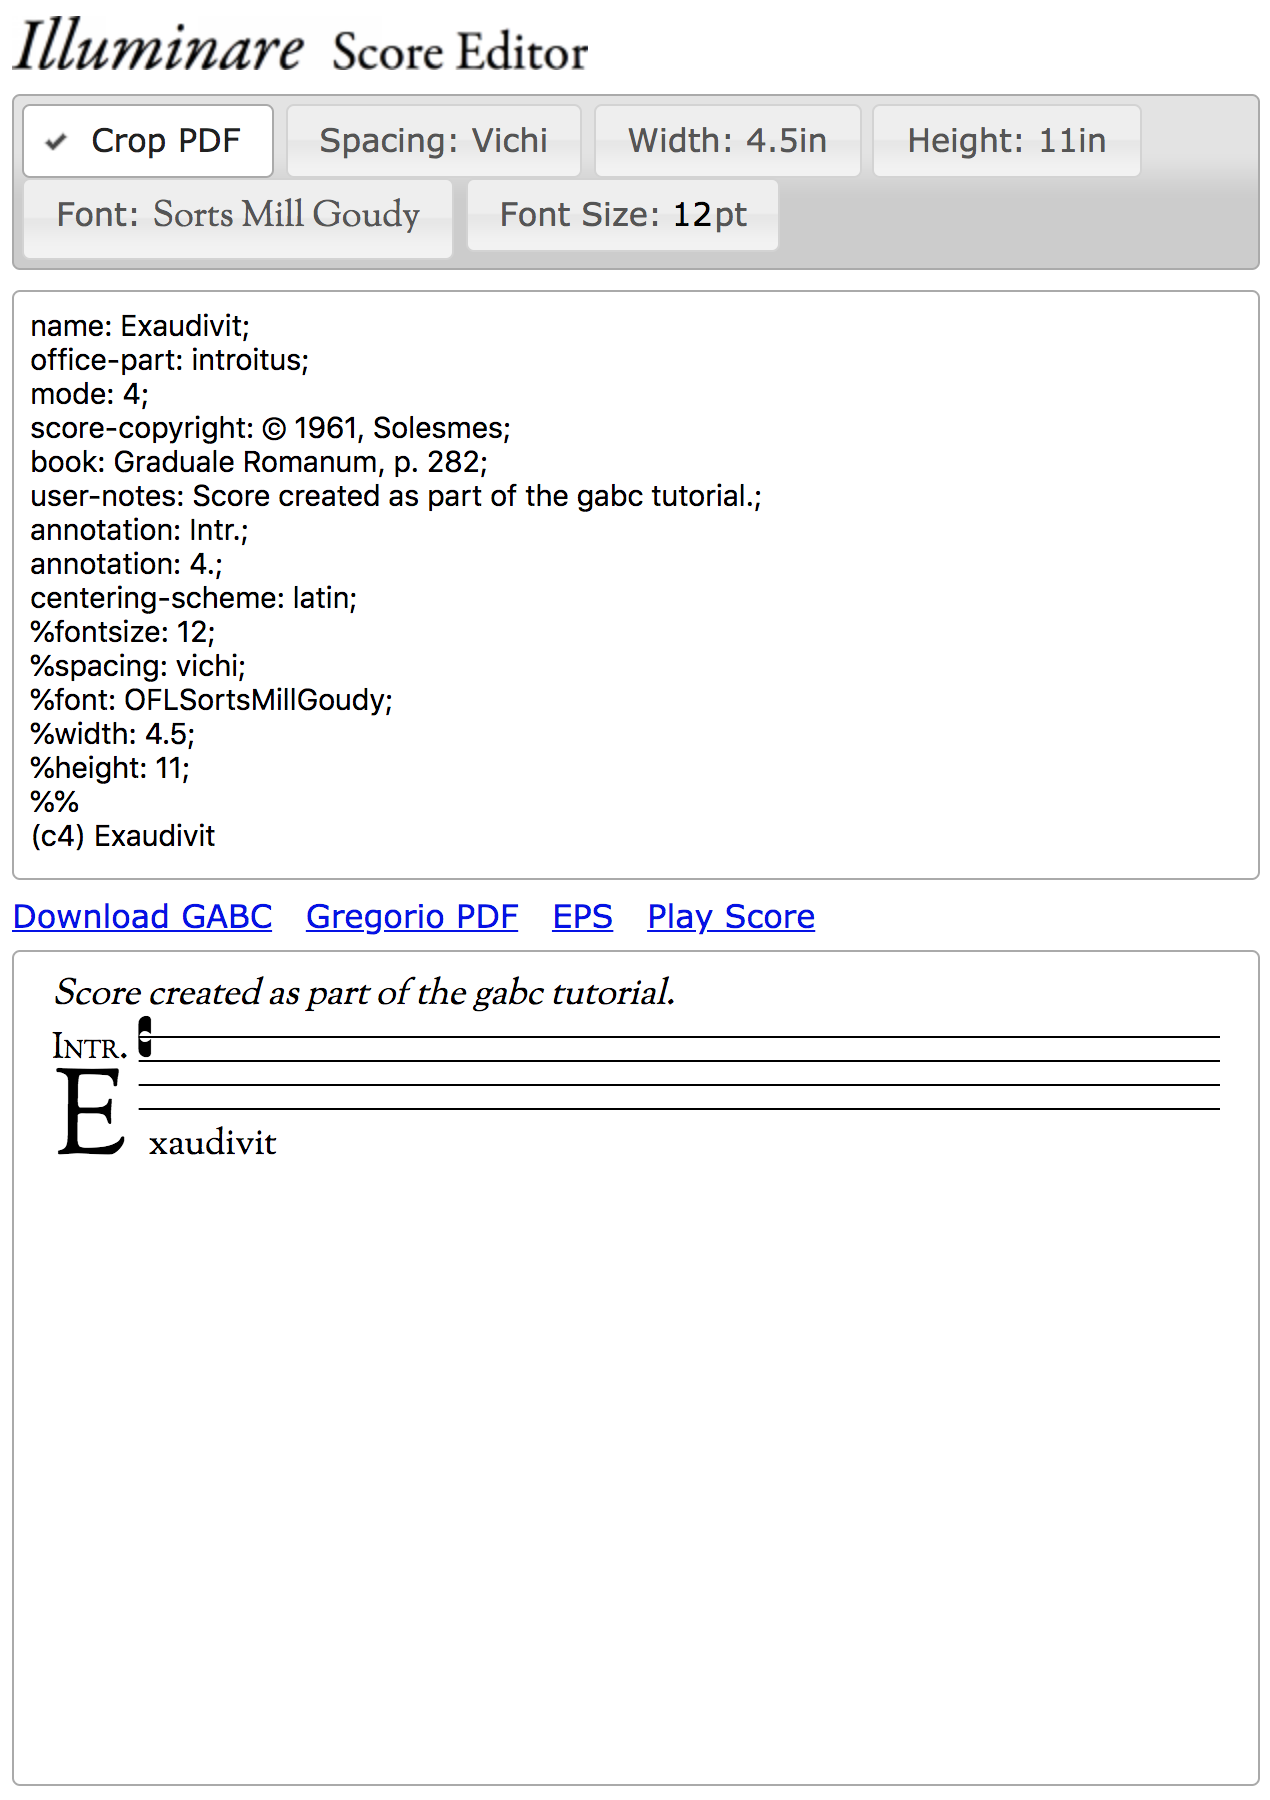
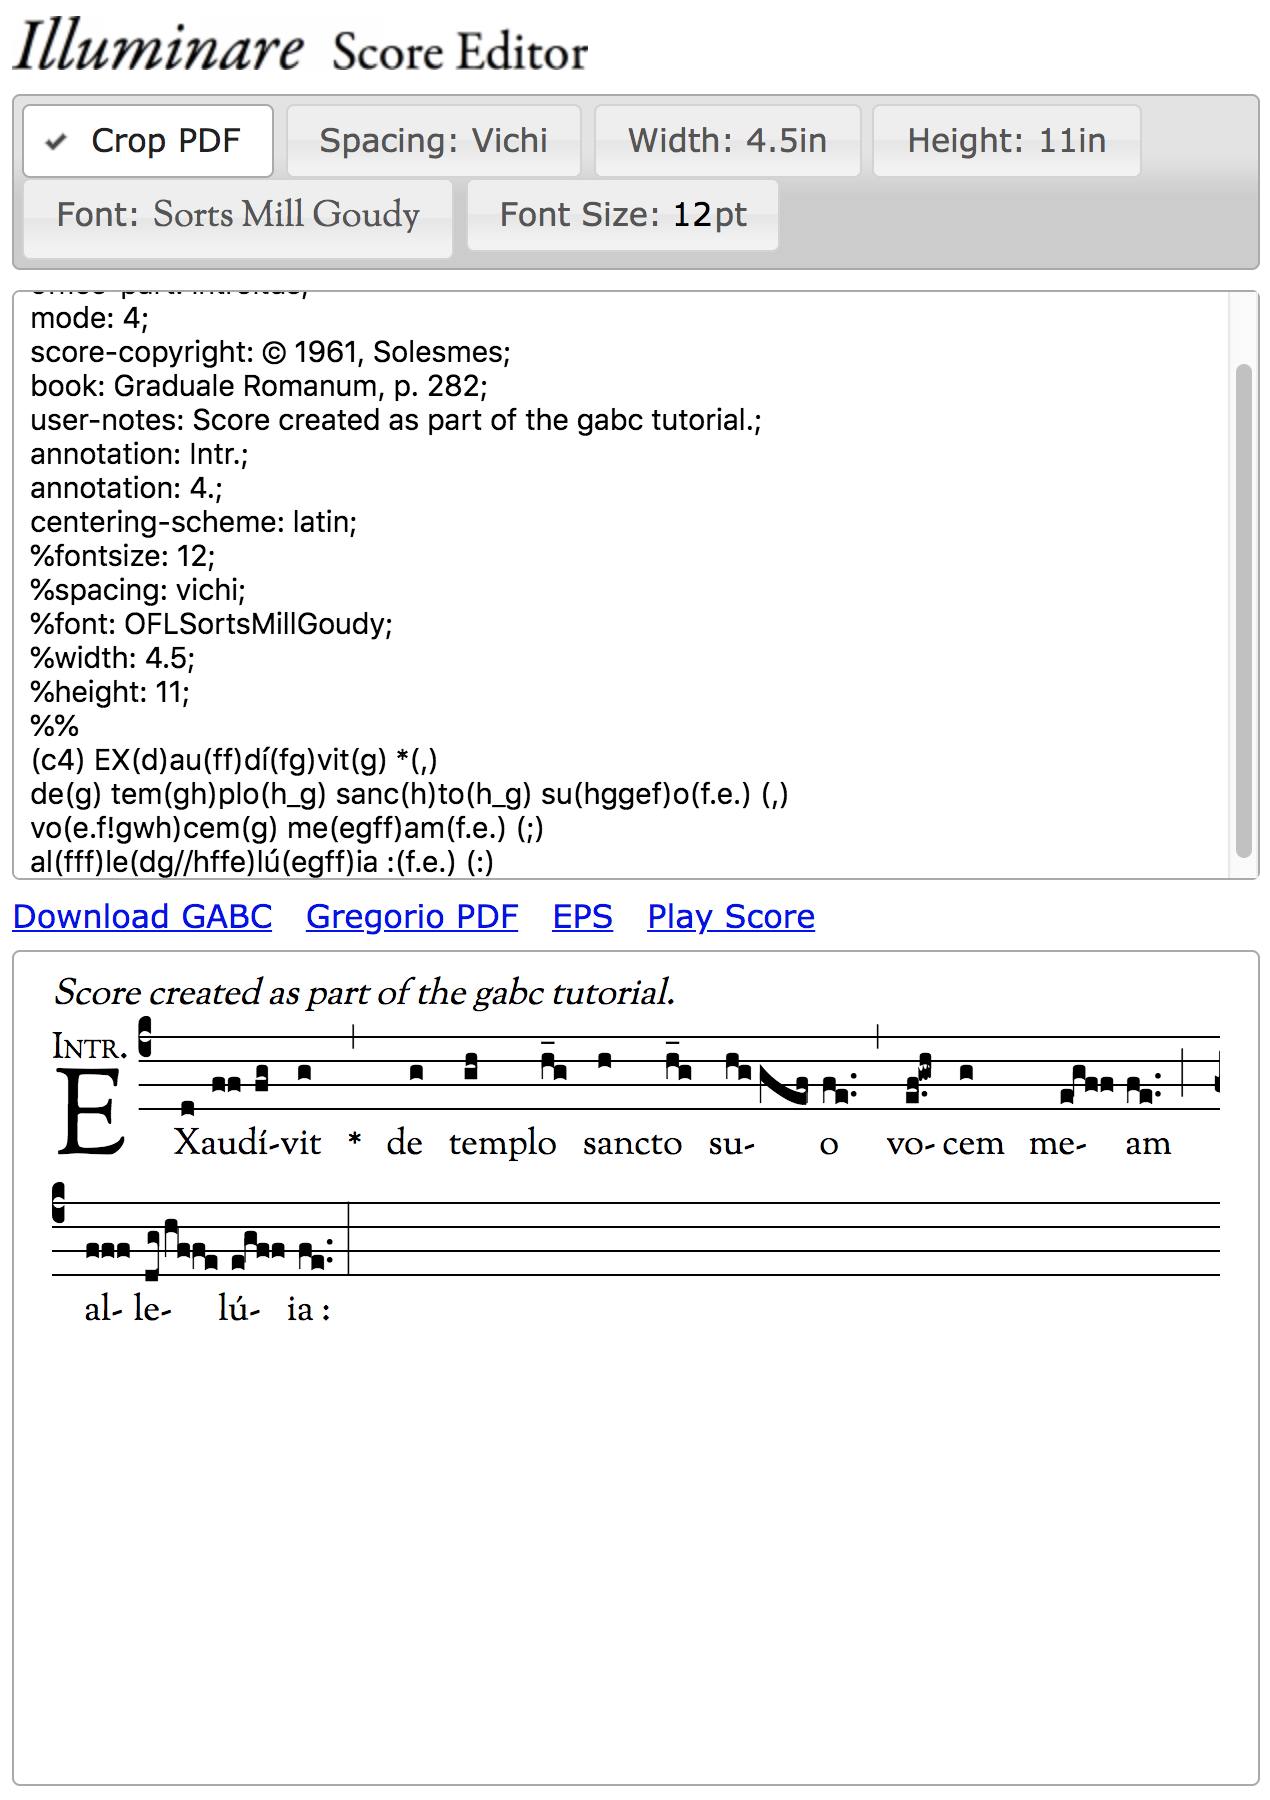
Besides these “starter” headers provided by Illuminare, I know other information about this particular score which I’m also going to fill in. Once I do that I get something that looks like the following:

As you can see, the user notes have been placed as text above the score. This is what is called “header capture” and is a feature of GregorioTeX that allows you to make use (in a variety of ways) of the information recorded in any of the header fields of your score without having to retype (or even copy/paste) it into the main document. It is controlled entirely on the TeX side of things, however, so Illuminare is handling this in the background for us and we cannot adjust it in this interface. The best we could do here is to comment out the user-notes line (i.e., put a % in front of it) if we wanted to make that line disappear.
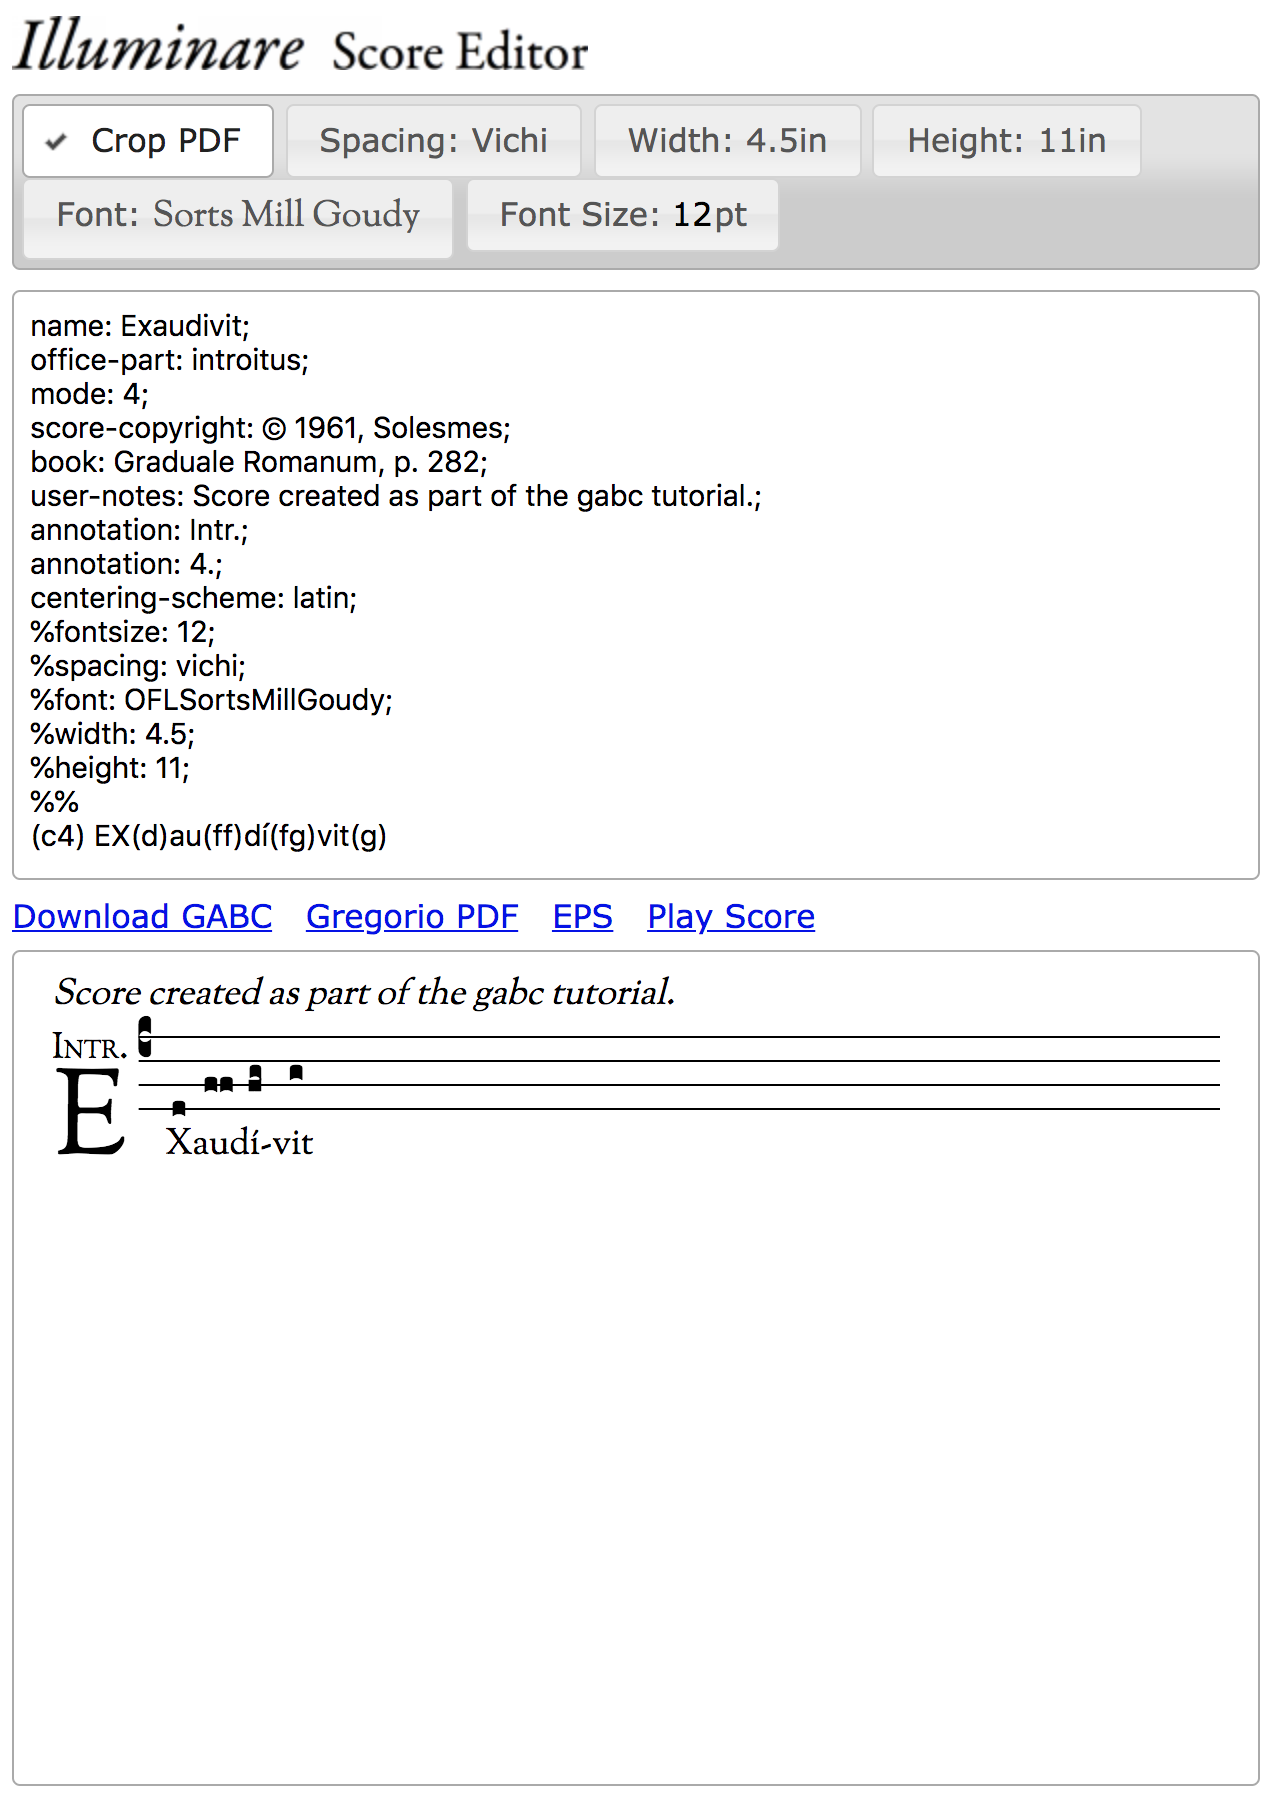
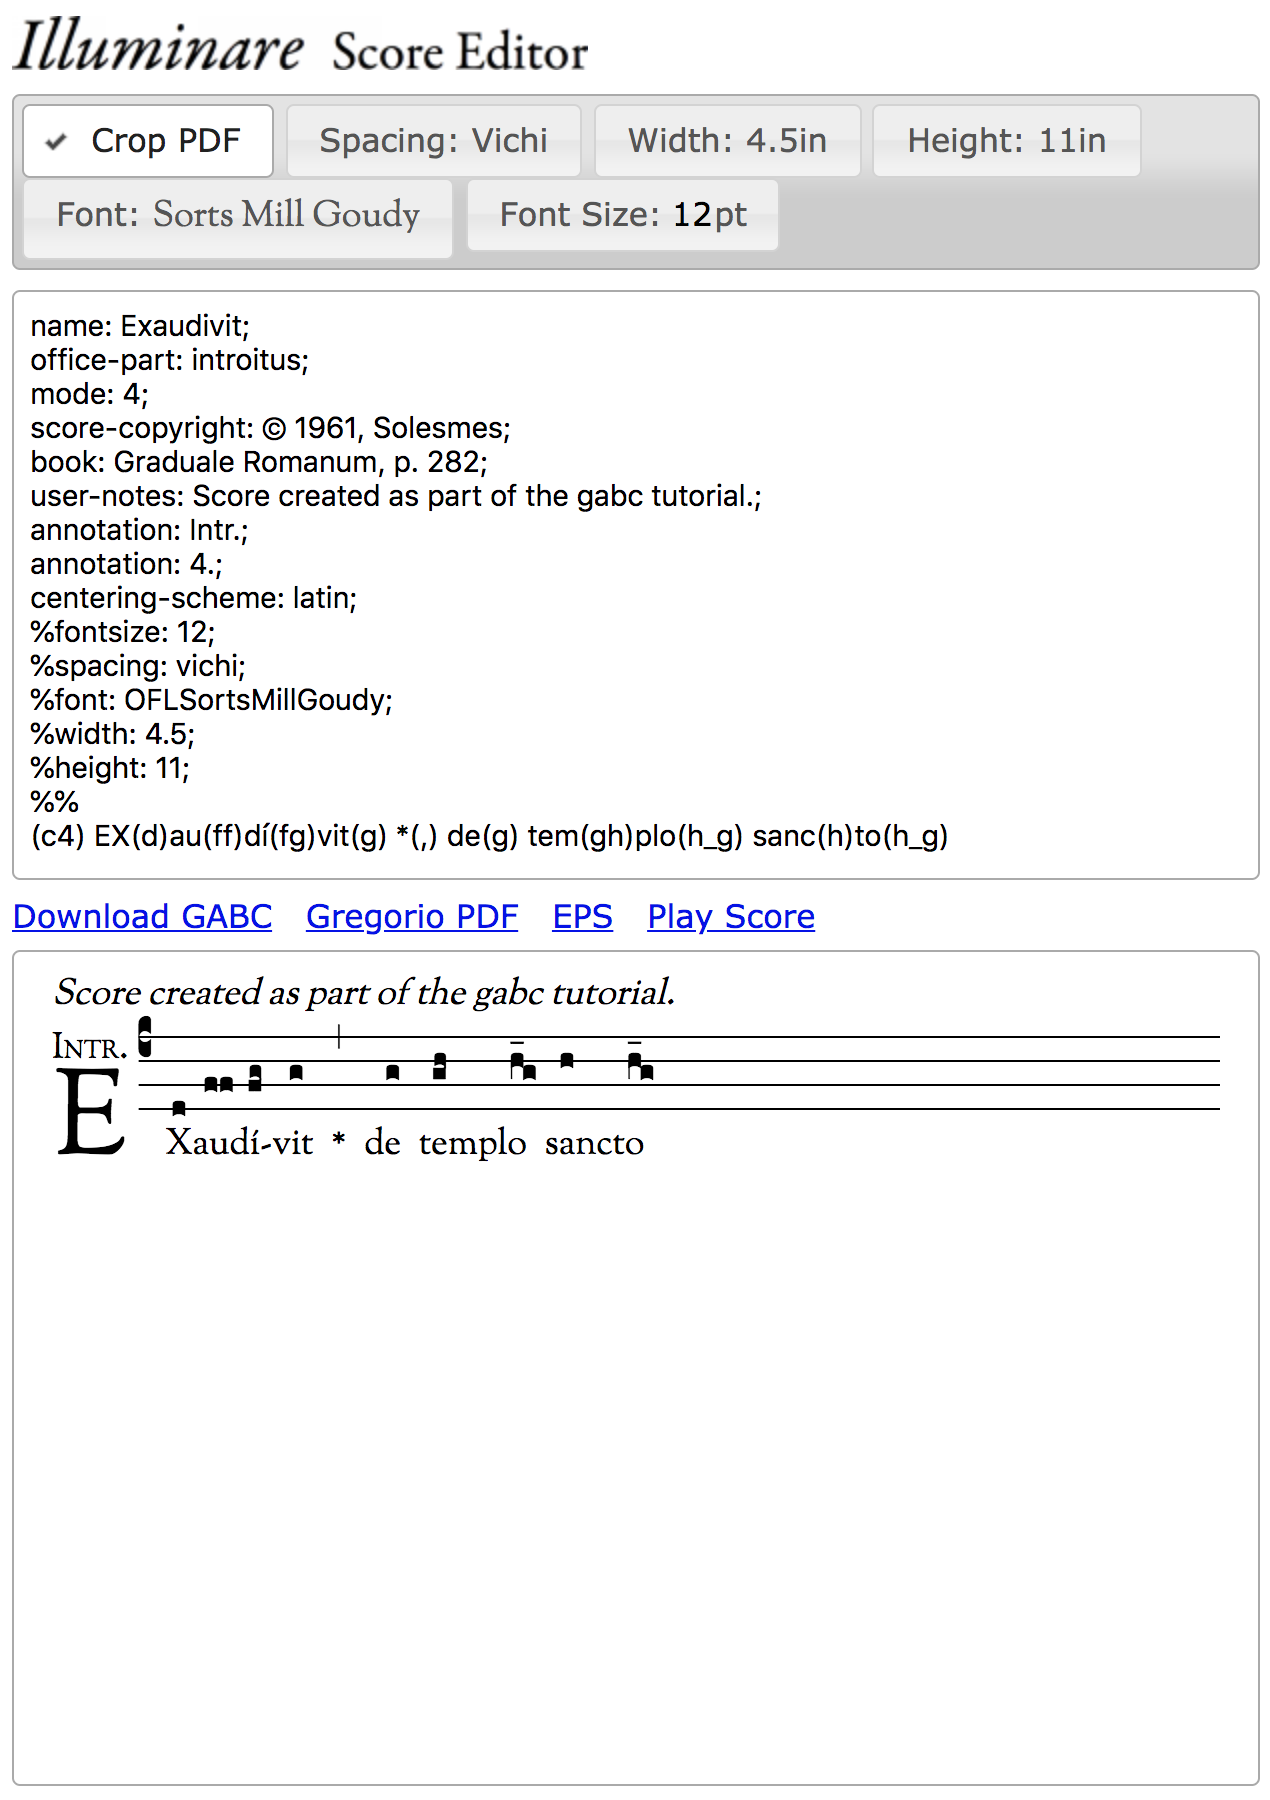
You’ll also note that even though we put in the annotation headers, the annotations themselves have not shown up in the output. That’s because the annotations appear above the initial. Since we don’t have an initial yet, there is no place for the annotations to appear. So let’s put in the initial, indeed, let’s put in the whole first word:
Having done this we can now see another limitation of Illuminare: it can only handle 1 annotation line. The second line in the gabc is ignored. We can’t force Illuminare to change this behavior, so we’re going to have to live with it (at least until you’re ready to move on to learning TeX).
So, having put in the first word, it’s now time to start adding the notes. Now, notes are assigned to particular syllables and are marked off from the text of the lyrics by parentheses (()). Furthermore, each note (the pitch of the note) is represented by a particular letter. In this scheme g is in the middle space of the staff and we go backwards in the alphabet (towards a) as we go down and forwards in the alphabet as we go up. Unlike modern notes, there is no point at which the letters start to repeat. That’s because these letters are not note names, they are staff positions. For a similar reason the position or type of the clef does not affect the letters. g will always be the middle position (for a 4-line staff, it’s actually possible to have 2-, 3-, or 5-line staffs which would have a different middle position, but we’re going to ignore those because they are really uncommon).
Additionally stacked notes (called a pes or podatus) are entered from bottom to top, just like they are sung. Taking all of these into account the first word works out to look like this:

If you paid attention while you were typing, you’ll have noticed that Illuminare automatically matches parentheses when you type the opening one. That's to help you create well formed gabc code that won’t result in errors. Looking at the output, we can also see that hyphens get inserted automatically when they are needed. We don’t have the exact same hyphens as the original score because of minor variations in spacing and that’s something I’m not going to really worry about now.
What I am going to worry about, however, is the fact that a couple of my letters appear to be a bit different from the original. Looking closely at the original score we can see that the x is capitalized and that there is an accent on the first i. Before we go any further we should fix these two issues. Fortunately fixing them is easy. In the first case we just replace x with X and in the second we replace i with í. Now, if you keyboard doesn’t have a í on it, you could use whatever method your operating system provides for inputing such characters. Without knowing your OS I can’t tell you what that is, but every modern OS has one. However, Illuminare has provided a shortcut for us. If we place the cursor to the right of the i and enter ' then it will automatically swap out the i' sequence for í. It’s a convenient feature and one that will be used several times as we enter the rest of the score.
Having finished with the first word, we’re ready for the next feature which is a bar line. In particular this is a divisio minima (represented by a comma (,)) and it has an asterisk below it. That asterisk is treated just like the text in the first word and the bar line is the equivalent of a note attached to its “syllable”:

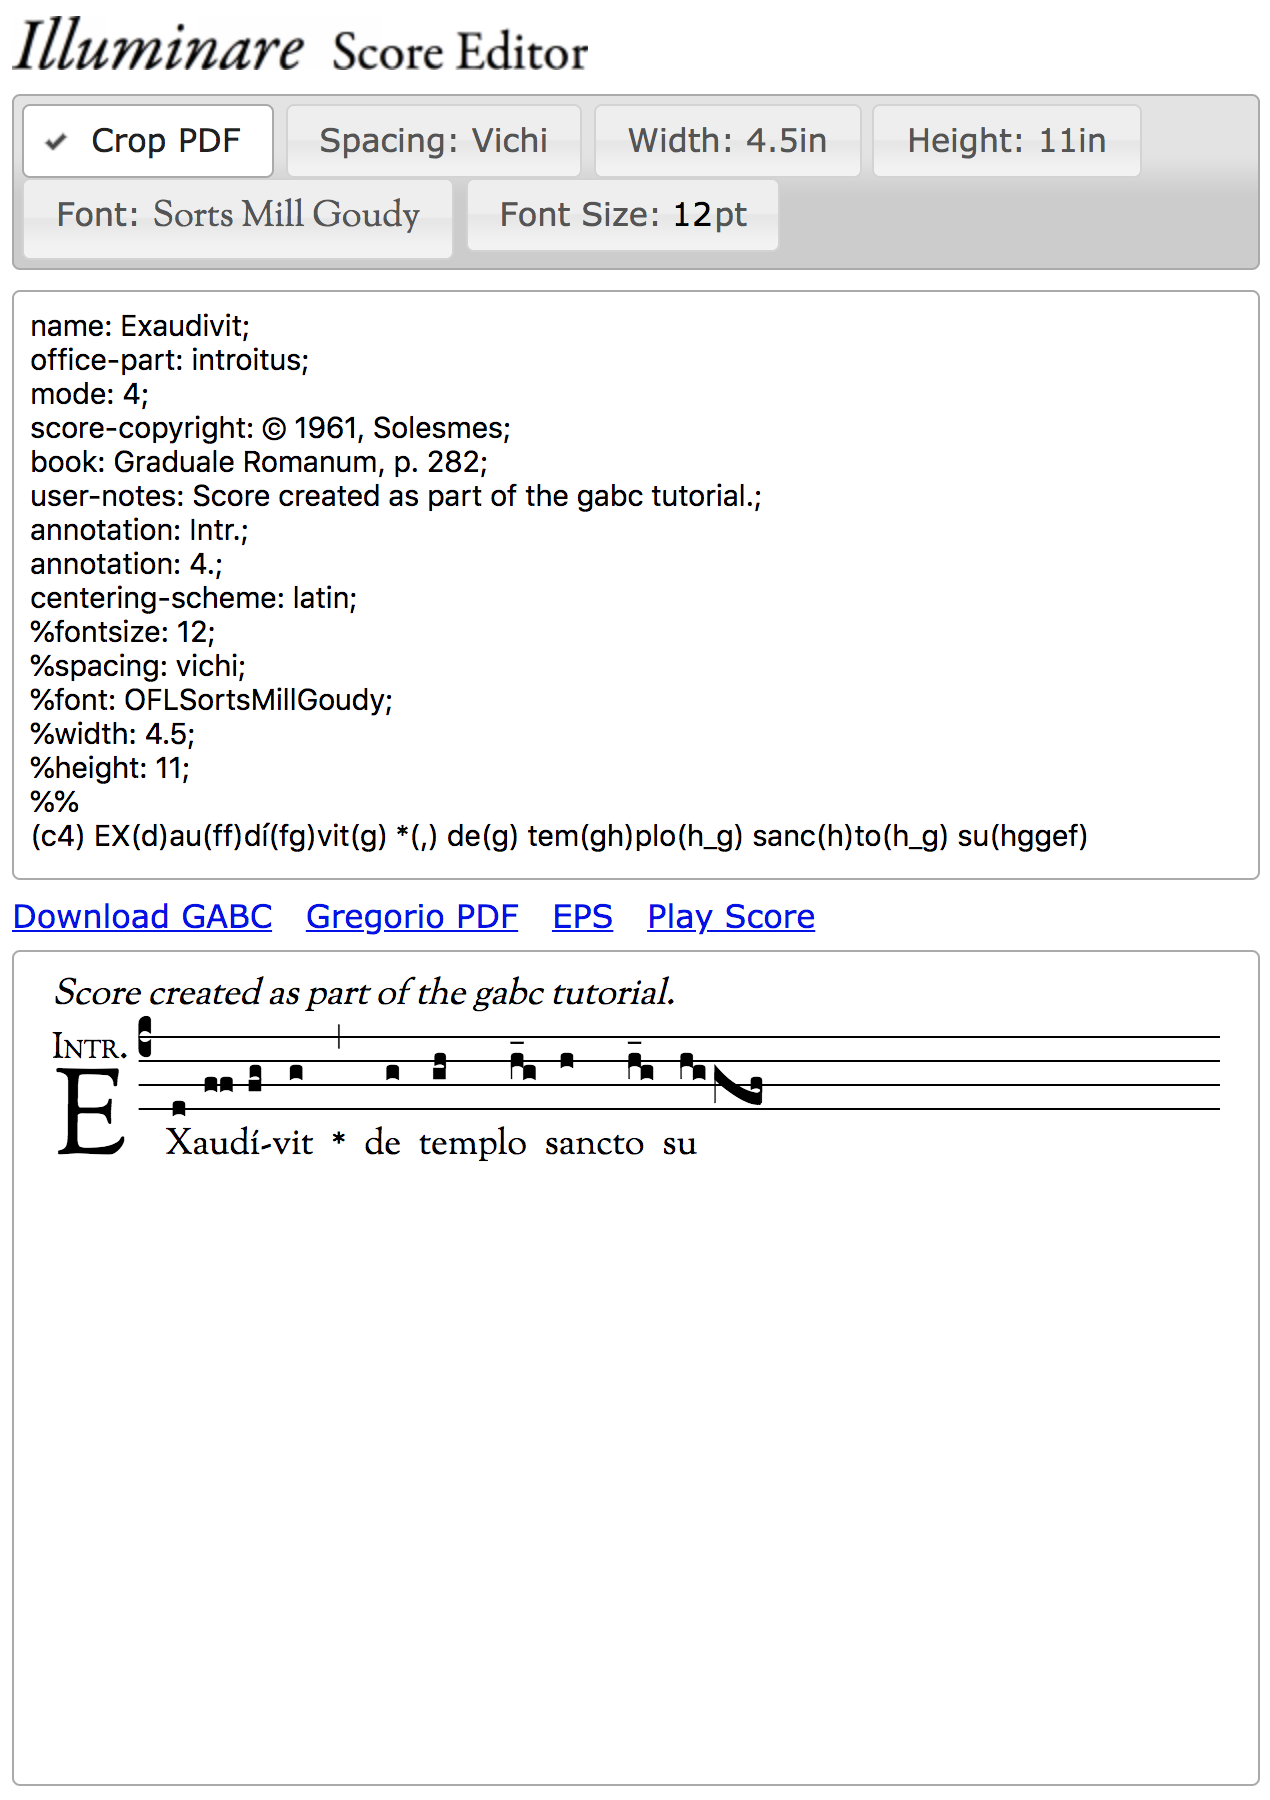
That was easy. Further, given what we’ve done so far you should be able to enter the next couple of syllables without too much trouble. When you get to the syllable “plo” however, you’ll find that there is a horizontal line over one of the notes and we haven’t discussed these yet. This line is what is known as an horizontal episema (sometimes referred to simply as an episema, pl. episemata). Adding one to a note simply requires that we put an underscore (_) after the letter corresponding to the pitch. With that information you should also be able to do the next word too:
The word that follows, however, has a far more complicated neume than we’ve seen thus far. What do we need to do to get that swooping structure (a porrectus)? Well, let’s start by entering the notes associated with the neume:
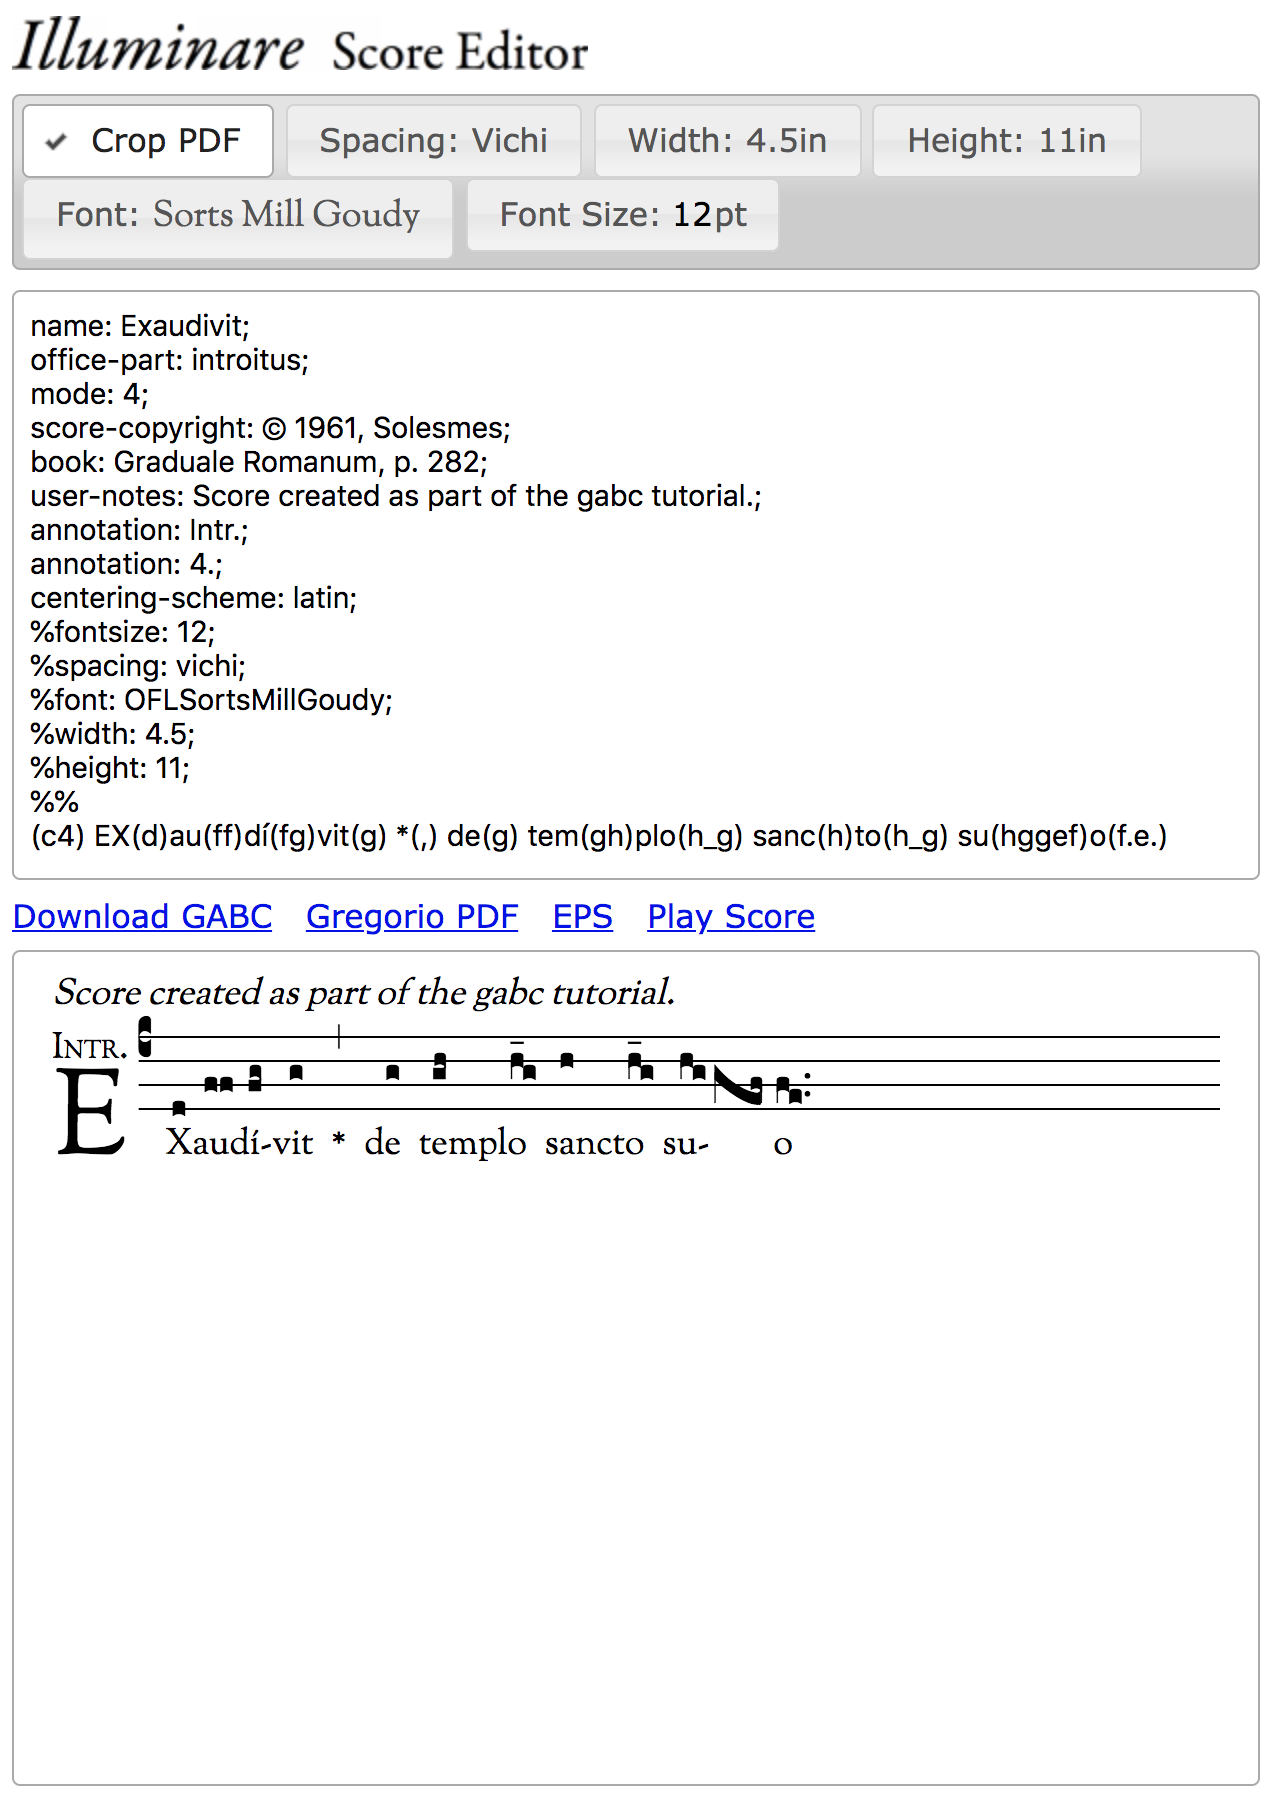
Well, what do you know. Just entering the notes was enough for Gregorio to do the right thing. Indeed, you’ll find that this is often the case. Gregorio is aware of the conventions that govern the choice of glyphs that go into a neume and follows them automatically. You’ll only need to intervene when you have a score that breaks those conventions (a fairly rare occurrence).
Looking at the next syllable we see something new to deal with again: dots after the notes (punctum moræ). These function much like the horizontal episamata we saw earlier in that they are represented by a period (.) after the note:
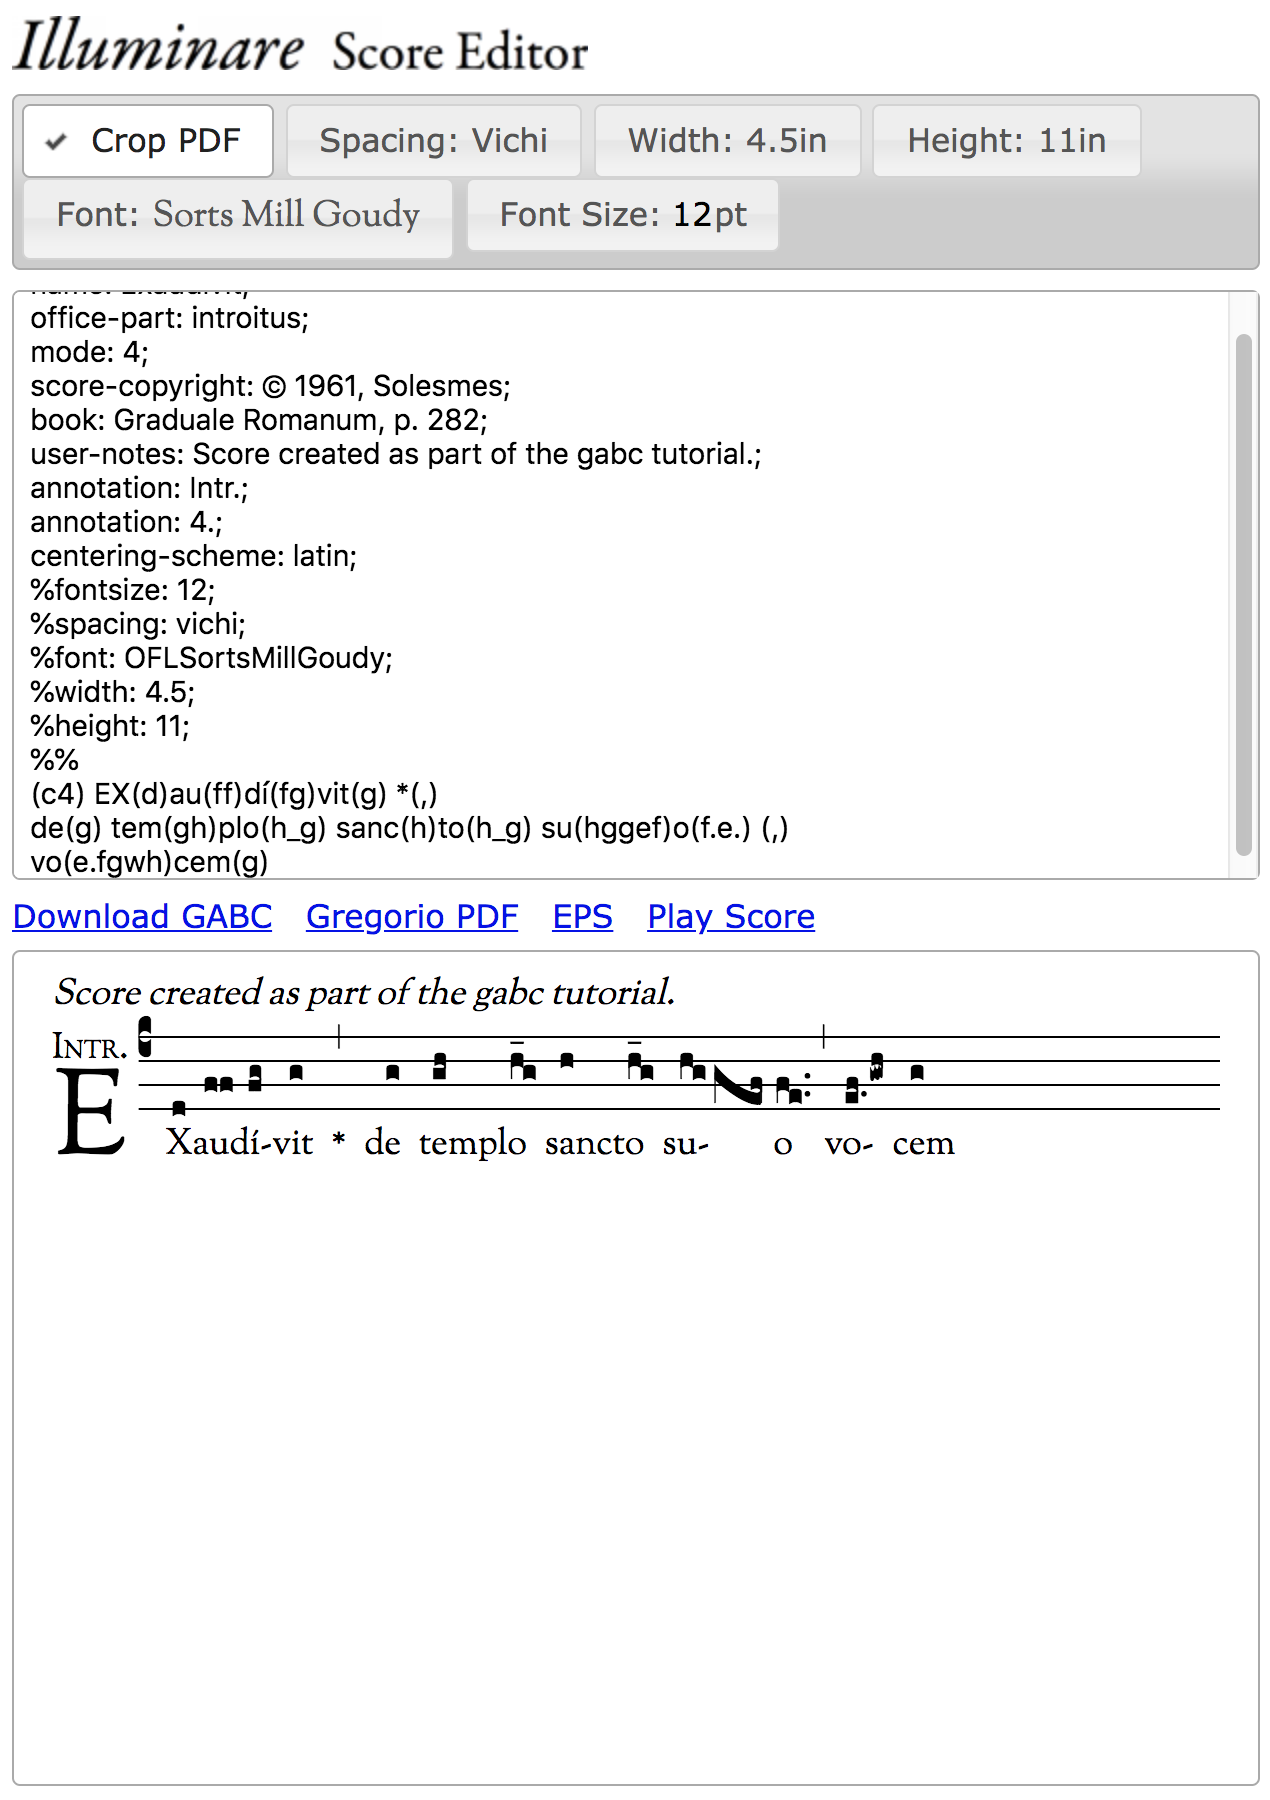
The bar that follows we handle just like we did before, just without the asterisk this time. I’m also going to introduce a hard linebreak into my gabc at this point. This line break doesn’t affect the way the score is laid out visually, it just helps me navigate the source should I need to go back and find a particular place later to make a change. Indeed, normally I add a line break after every bar line so I’m also going to go back and put one in after the one we did earlier. You’re free to adopt whatever convention you want for inserting linebreaks.
After the line break we come across a neume which has a wiggly note in it. This is what is known as a quilisma and is one of the different note shapes we come across in Gregorian chant. In gabc we indicate that a note should be a quilisma by putting a w after the letter identifying the pitch. Along with the rest of the word this gives us:
Hold on a moment! Why is there that extra space between the first two notes and the second two? Well, as it turns out, Gregorio has shifted those two notes in order to avoid a potential collision with the punctum mora on the first note. Try taking it out and you’ll see that the two top notes shift back to where we want them to be. Now the punctum mora and the higher notes will not collide if they are placed in the desired positions, so how do we get the notes to be attached and have the punctum mora? The answer is to tell Gregorio not to put a space before the quilisma. This is accomplished with an exclamation point (!):

The next feature of the score we reproducing is the half-note that ends the line. This is called a custos and is used to advise the singer as to what the first note of the next line is. Since we’re not actually ready to end the line in our score, we’re going to ignore it for now and instead enter the remaining text and notes through the “alleluia”. That should be enough material to figure out where to end our line. Along the way we have to deal with two bar lines we haven’t seen before: the partial bar (divisio minor) and the full bar (divsio maior). The first is represented by a semi-colon (;) and the second by a colon (:):
Hey! What do you know, Gregorio has automatically inserted the line break with the correct custos for us. We don’t actually have to describe that portion of the score. This makes it much easier to reuse scores in different contexts where things may change the line breaking decisions (width of page, size of text, etc.). As a result we can just ignore the line breaks in our source and keep going.
All is not well, however. If you look at the syllable “le” you’ll notice that two notes which are not joined in the source appear to have been joined automatically by Gregorio. If you look really close at the image, you’ll note that they are not actually joined, they are just so close together that the vigræ (the stem joining the two stacked notes and the stem descending from the highest note) appear to merge. We don’t want that, so we need to tell Gregorio to put more space in there, the opposite of what we did earlier. The character for that is a forward slash (/) and I’m actually going to put in two of them to get a larger space:
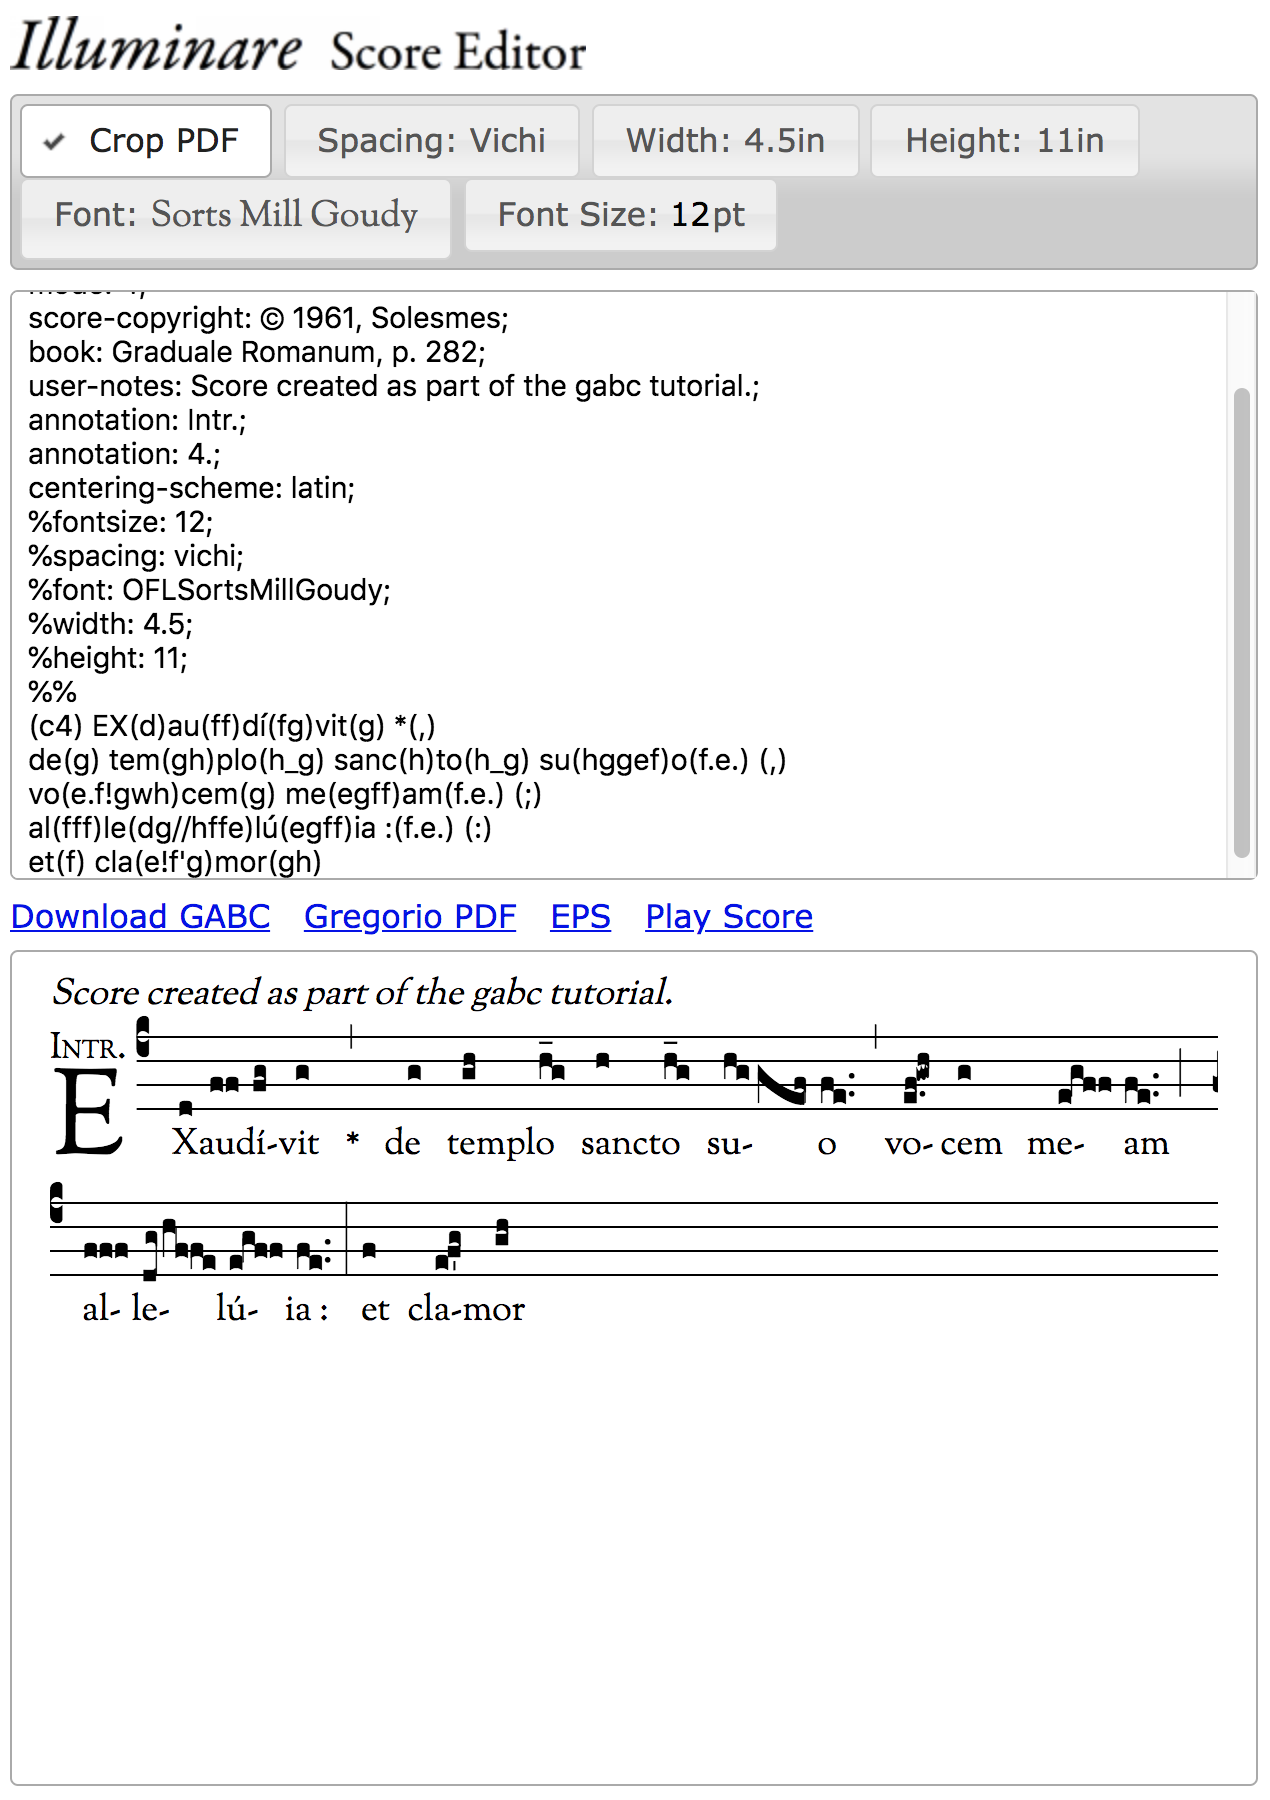
As we continue with the score, the next novelties that we encounter are in the word “clamor”. Let’s start by simply inputting the notes and lyrics to the end of that word:

To start with the first syllable of “clamor,” there are two issues to deal with: first the notes have not been grouped together correctly, and second there’s a tick-mark that is supposed to be below the middle note of the sequence. To deal with the first we have to tell Gregorio where the note grouping boundaries are. We do this by introducing an exclamation point (!) between the two note groups. You’ll recall that we used this character earlier to tell Gregorio not to put a space between the two note groups in the first syllable of “vocem”. In that case Gregorio was already grouping the notes correctly, it was just introducing extra space. In this instance we have the opposite case: Greogrio is not introducing any extra space, but it is not grouping the notes correctly. The exclamation point (!) is a no-space group boundary for the notes and so it works in both cases to correct what Gregorio is doing wrong. To add the tick-mark, what’s called a vertical episema (or ictus), we need to add an apostrophe (') after the note that needs the mark:
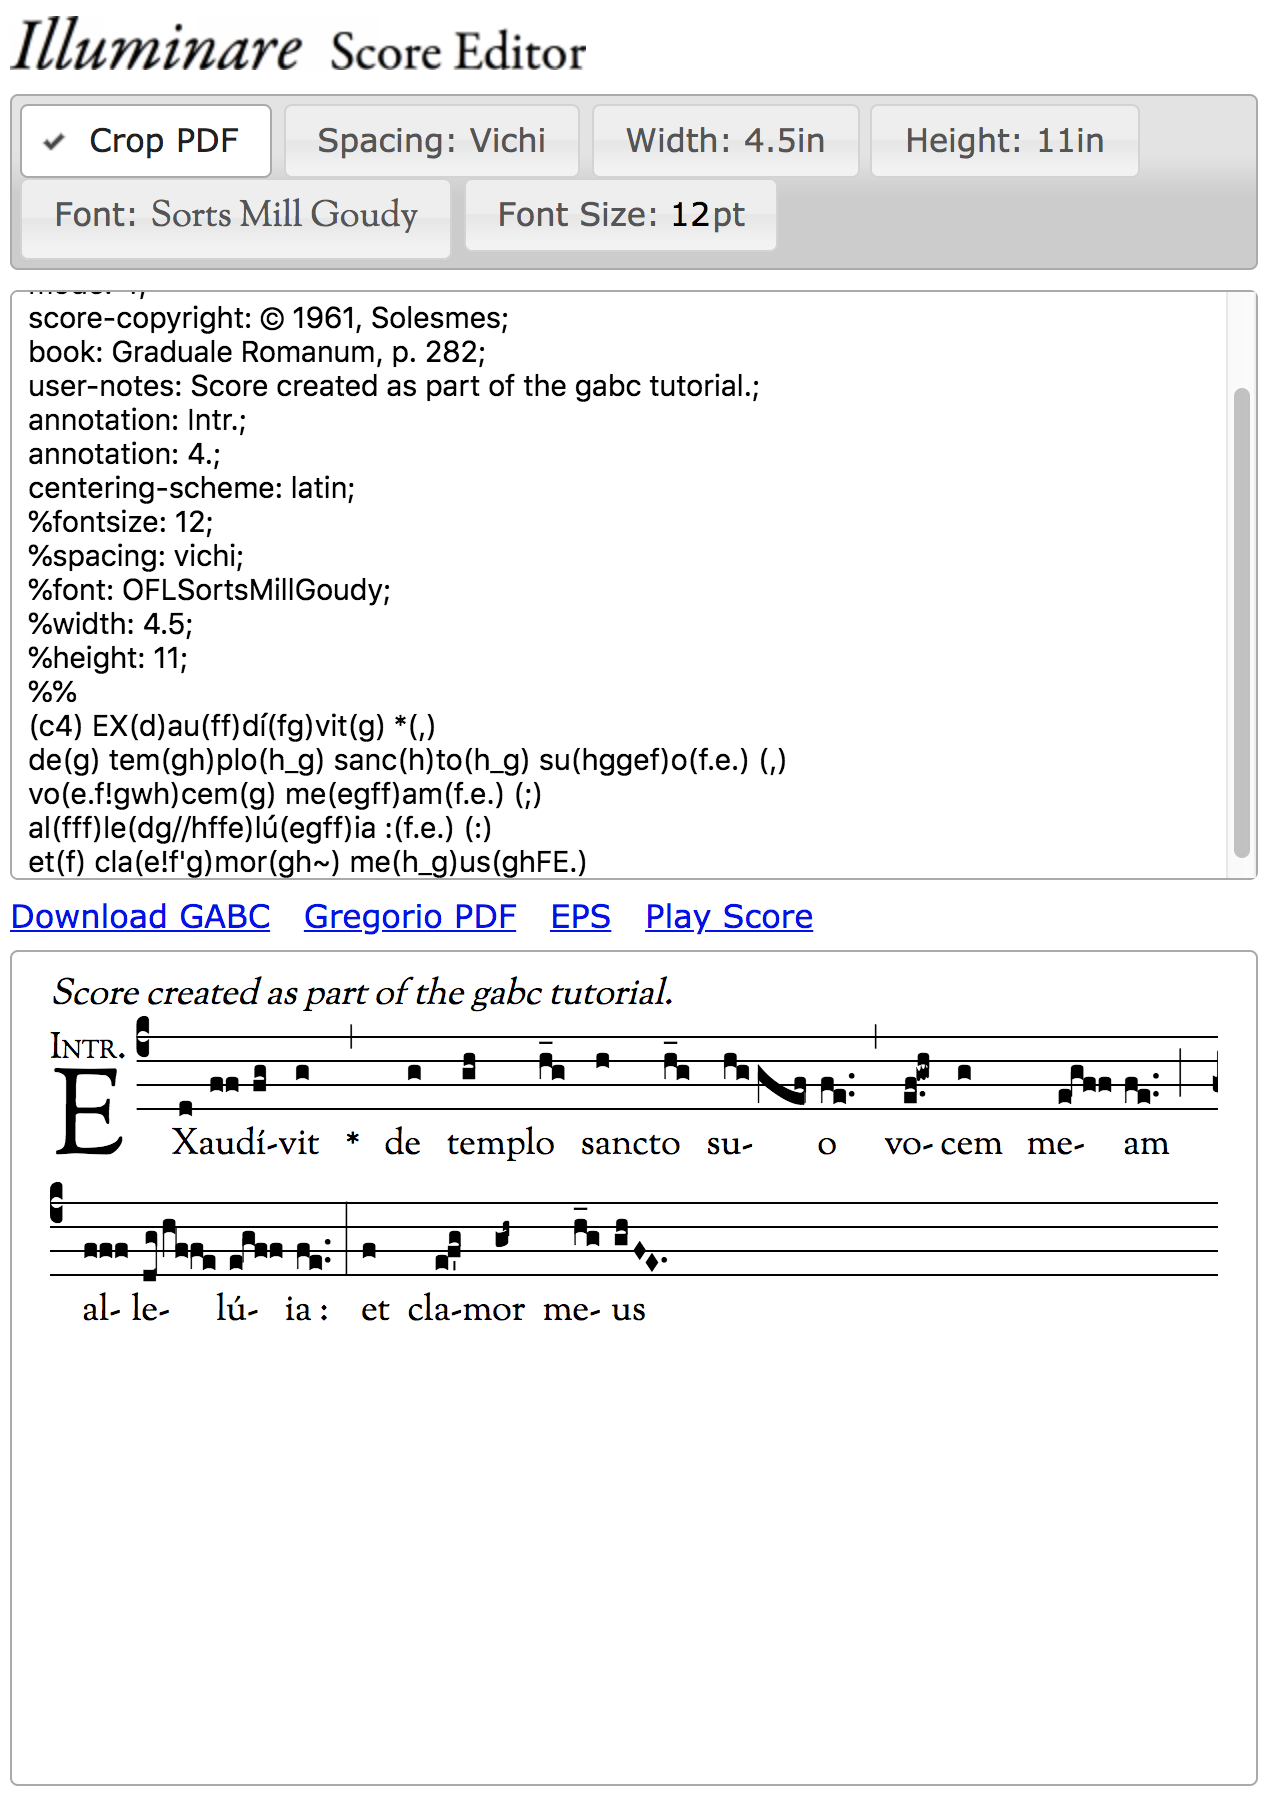
Having fixed the first syllable of “clamor” we now need to fix the second. In this syllable the second, higher note is smaller than normal. This is called a diminutive liquescent and is represented in gabc by appending a tilde (~) to the note:

Our next challenge comes in our next word, “meus,” where we have a pair of diamond shaped notes (as opposed to the square ones we’ve largely been dealing with thus far). These notes are called punctum inclinatum (the square notes are called punctum quadratum) and are indicated by capitalizing the letter corresponding to the appropriate pitch:
At this point, we’ve actually been over quite a number of features of gabc. Enough, in fact, that you should be able to input everything up to but not including the last word of the third line (“ejus”) using what we’ve been over. In fact, I challenge you to do just that before continuing with the tutorial. Review what you need to and when you’ve got all of those notes entered, click here to continue with the tutorial.